Wget is a popular free command-line utility used for downloading files from the web using HTTP, HTTPS, and FTP protocols. It supports both Internet Protocol version 4 (IPv4) and Internet Protocol version 6 (IPv6) addresses.
If you want to forcibly choose either IPv4 or IPv6 for wget while downloading files, you need to do it explicitly or change the default configuration.
[ You might also like: How to Set Static IP Address on Ubuntu Linux ]
In this guide, I’ll walk you through forcing IPv4 or IPv6 connections for wget utility for downloading files from the web in Linux.
Install Wget On Linux
Before we proceed further to use wget, you need to install it first if your Linux system does not come with it by default.
$ sudo apt install wget      [On Debian/Ubuntu/Mint]
$ sudo dnf install wget      [On RHEL/Fedora/CentOS]
$ sudo zypper install wget   [On OpenSUSE]
$ sudo pacman -Sy wget       [On Arch/Manjaro Linux]
Force Wget to Connect To Either IPv4 Or IPv6 Explicitly
If you use the general 'wget <URL>' command, it checks both A records in DNS that holds only 32-bit IPv4 address of the given domain and AAAA records in DNS containing 128-bit IPv6 address.
$ wget https://ftp.gnu.org/gnu/wget/wget-latest.tar.gz

Then, wget most probably connects to IPv6 or IPv4.
Force Wget to Use IPv4
In case you want wget to only look for IPv4 address and connect to it, you need to use the '--inet4-only' flag with wget command as shown.
$ wget --inet4-only https://ftp.gnu.org/gnu/wget/wget-latest.tar.gz

Using the above command, wget only checks IPv4 address in A records and ignores IPv6 address in AAAA records.
Force Wget to Use IPv6
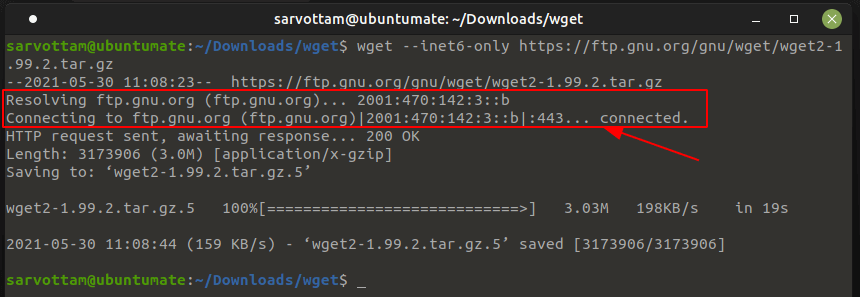
Similarly, you can also use '--inet6-only' flag to connect wget forcibly to IPv6 address by ignoring A records and IPv4 addresses.
$ wget --inet6-only https://ftp.gnu.org/gnu/wget/wget-latest.tar.gz

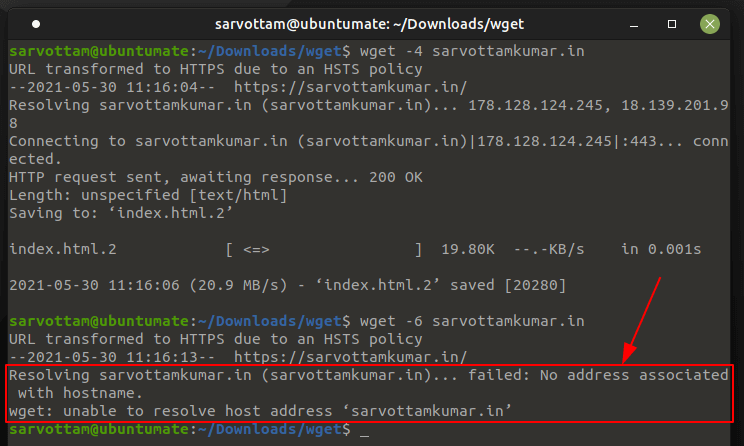
If the host DNS records do not contain an IPv6 address, it will show the error as shown in the below picture.

Force Wget to Connect to Either IPv4 Or IPv6 By Default
Alternative to '--inet4-only' or '--inet6-only' option, wget also lets you change its default behavior to completely avoid IPv4 or IPv6 addresses and connect to only one address without taking any flags every time.
What you need to do is set or unset 'inet4_only' in the wget initialization file .wgetrc located either at /etc/wgetrc (system-wide for all users) or $HOME/.wgetrc (for a single user).
inet4_only = on/off
It works the same as '--inet6-only' where wget forcibly disables connecting to IPv4 and connects only to IPv6 hosts by default. Likewise, you can also turn off the IPv6 look-up and connect to only IPv4 by adding the following line in the global init file.
inet6_only = on/off
Set Wget to Use IPv4 or IPv6 by Default
In case you want wget to look first for IPv6 or IPv4 addresses all the time, you can also change the order of choosing addresses by default.
The only thing you need to do is edit the value of the '--prefer-family' option in the wget initialization file .wgetrc.
--prefer-family=none/IPv4/IPv6

Based on the above value, while accessing a host that resolves the domain name to both IPv6 and IPv4 addresses, wget try to connect to the addresses with the specified address family first, and if it does not found the address, then it moves to another family address.
This also helps wget to choose between IPv4 and IPv6 connection if the configuration in the host’s DNS record supports both.

I was stuck with this for 2 days now. But after reading this guide I can say that it wasn’t really so difficult. You can find your public IP address using:
https://myipv4address.com.