Efficiently managing file permissions is an essential aspect of maintaining robust access control and ensuring top-notch security within Linux systems. Every individual file or directory contains a set of permissions that dictate the privileges for reading, writing, and executing.
Think of these permissions as keys that are distributed among different groups of users – the “Owner”, the “Group”, the “Others”, and the “All”.
But here’s where it gets even cooler: by employing the chmod command, you gain the ability to tweak and adjust these permissions, essentially taking control over who can do what with a file or directory.
This blog covers all aspects of the chmod command, ensuring mastery over it as a Linux user.
What is chmod Command in Linux?
The chmod (abbreviation for “change mode”) command is used to alter the permission or access mode of the files and directories on Unix-like operating systems, including Linux.
Before we discuss the syntax of the chmod command, let’s address some of the fundamental questions to deepen our understanding.
Types of Permissions in Linux?
There are three modes of permissions which are stated below:
| Permission | Mode | Description |
| Read | r | Read the file or display the names of files within a directory. |
| Write | w | Allow modification of the content in a file or directory, including their creation, deletion, and renaming. |
| Execute | x | Permits execution of files or the traversal of directories |
With an understanding of the actions that can be applied to files and directories, the question now arises, Who holds the authority to carry out these actions?
To Whom Permission Will be Granted?
In Linux, users are categorized into groups to facilitate permission allocation. These categories help ensure that specific individuals or groups are granted the correct/required level of access.
The categories are as follows:
| Class | Reference | Description |
| User | u | Refers to the owner of the file. |
| Group | g | Refers to the members of the file’s designated group. |
| Others | o | Refers to the users who neither own the file nor belong to the file’s group. |
| All | a | Represents all users, including user (file owner), group, and others. |
Syntax of chmod Command
The basic syntax for the chmod command is given below:
$ chmod [options] [permissions or mode] [directory_name/file_name]
Here is the breakdown of this command:
[options]– These are the optional flags/options which are responsible for altering the behavior of the command.[permissions or mode]– This is where you define (grant or revoke) the permissions you intend to apply to the file or directory. This can be accomplished through the use of symbolic notation, numeric notation (octal mode), or by referencing another file’s permissions.[directory_name/file_name]– This represents the name of the file or directory to which you want to apply the permissions.
If you’re curious about the available options and flags of the chmod command, you can run the following command in your terminal:
$ chmod --help
It will display brief information about the usage of the chmod command, along with the options/flags it offers.
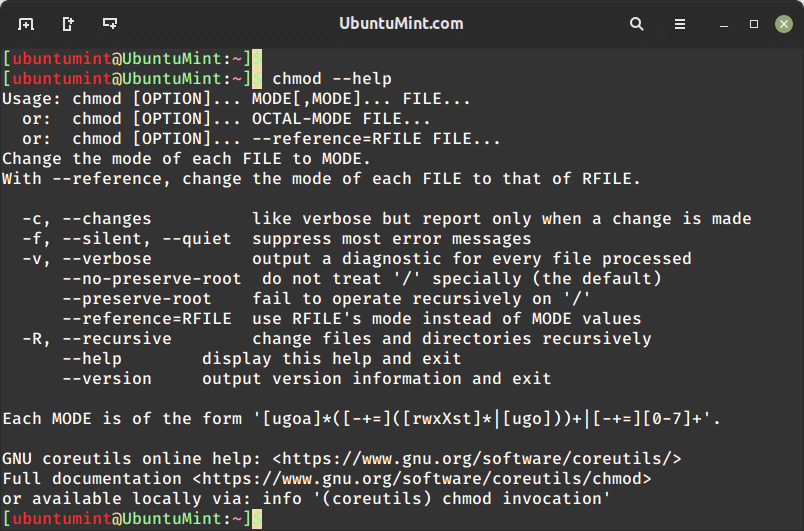
Having a grasp of these flags empowers you to navigate the versatility of the chmod command efficiently. Now, let’s delve into the process of viewing and interpreting file permissions of any file or directory before we proceed to explore the methods of adding or abolishing file permissions.
How to View File Permissions in Linux?
To examine the current file permissions of a specific file, use the ls command stated below:
$ ls -l ubuntumint.txt
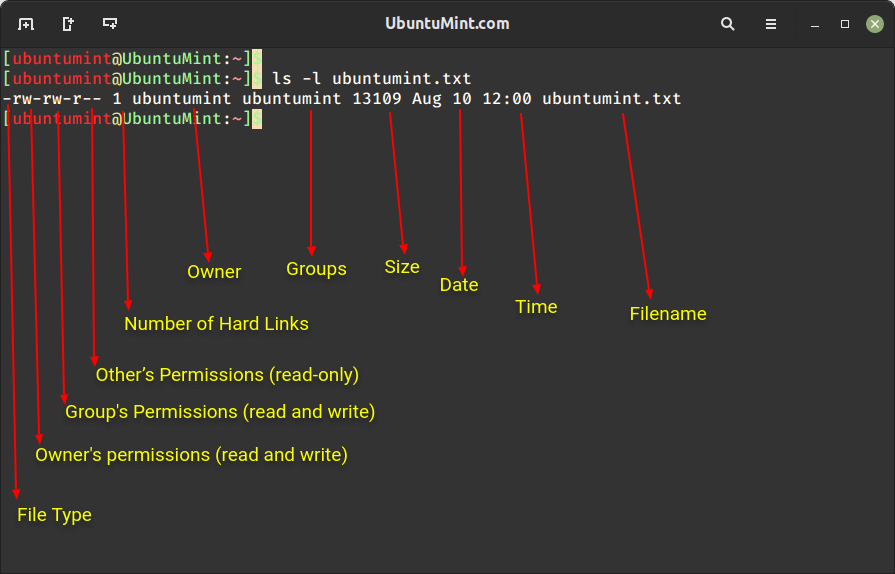
The above code snippet reveals valuable information about the file’s permissions and ownership.
- File Type – The first character indicates the type of input. The symbol
“-”represents a regular file,"d"indicates a directory, and"i"refers to a symlink. - Owner’s Permissions – The initial
“rw-”indicates that the file owner possesses read and write permissions("rw-")for the file. The presence of“-”in place of execute signifies that the owner cannot execute this file. - Group’s Permissions – Similarly, the group’s character set means the group users can also read and write the file only
(“rw-”). - Other’s Permissions – For other users, the
"r--"signifies read-only permission. - Number of Hard Links – The number
"1"represents the number of hard links to the file, indicating the number of directory entries that reference the same file. - Owner – The next occurrence of “ubuntumint” represents the owner of the file.
- Group – The second occurrence of “ubuntumint” represents the group to which the file belongs.
- Size – The number 13109 represents the file size in bytes.
- Date and Time – The value Aug 10 12:00 represents the date and time when the file was last modified.
- Filename – ubuntumint.txt is the name of the file.
This foundational knowledge prepares you for modifying permissions as needed.
How to Modifying File Permissions in Linux
The chmod command offers three methods for modifying permissions: numeric notation (octal mode), symbolic notation, and reference file.
Let’s look into each of these methods to empower you with the ability to customize permissions as needed.
Change File Permissions Using Octal Mode
Numerical notation allows you to establish permissions directly using a numeric value, each permission corresponds to a specific numeric value. To set permissions, you provide three values: the first for owner’s permissions, the second for group permissions, and the third for permissions granted to others.
In this notation, the permission values are as follows:
- 4 for read permission
(r). - 2 for write permission
(w). - 1 for execute permission
(x).
To calculate the desired permission value, sum up the values associated with the permissions you intend to grant. For instance, if you want to grant read and write permissions to the file owner, your first value would be 6 (read (4) + write (2)).
Similarly, if you intend to provide read and execute permissions to the group, the value would be 5 (read (4) + execute (1)).
Following the same pattern, once you’ve determined the permissions for all user groups, combine them to create a three-digit numeric code.
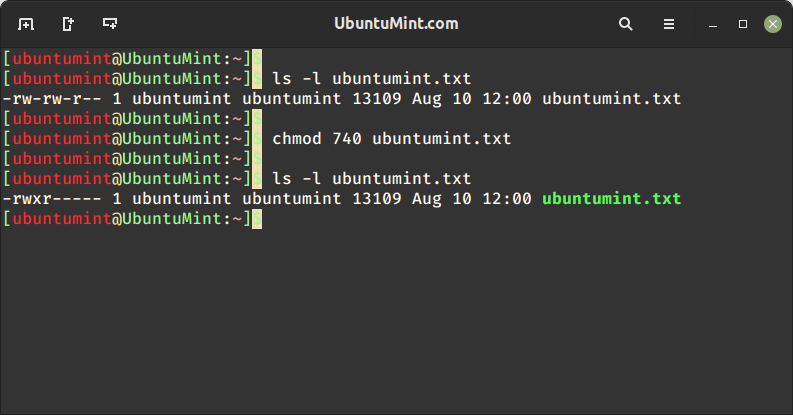
For example, if you wish to bestow read, write, and execute (7) permissions to the file owner, read-only (4) permissions to the group, and no (0) permissions to other users, you can run the provided command:
$ chmod 740 ubuntumint.txt
This will effectively set the permissions for the file “ubuntumint.txt” as desired for each respective user class.
Set File Permissions Using Symbolic Notation
Symbolic notation offers a more intuitive way of adjusting permissions on files and directories.
The symbols used in symbolic notation are as follows:
+– Add/grant permission.-– Eradicate/remove permission.=– Set/define permissions exactly as specified.
To use symbolic notation, you start with the user class, followed by the symbol operator, and then the permission (r, w, or x). You can combine different classes and operations to apply changes to multiple groups at once.
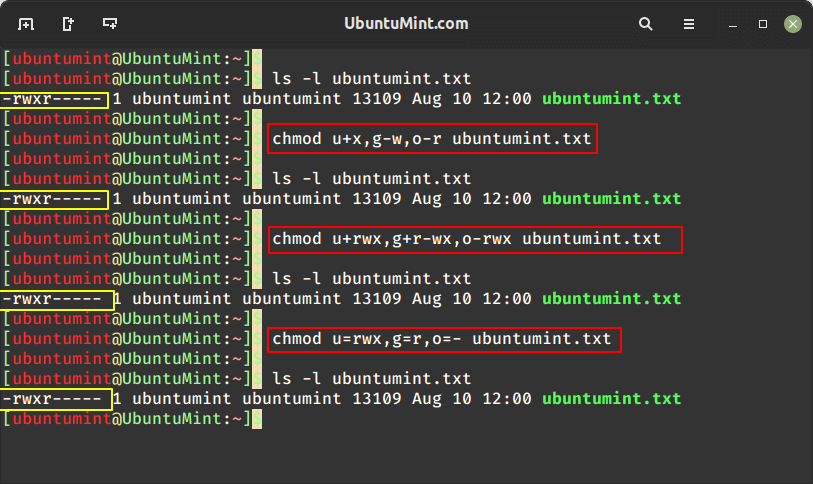
Let’s explore an example: Suppose you want to grant execute permission (+x) to the file owner, remove write permission (-w) from the group, and remove read permission (-r) from other users for the file “ubuntumint.txt”.
To do so, simply run this command:
$ chmod u+x,g-w,o-r ubuntumint.txt
This command will successfully manipulate the permissions of the “ubuntumint.txt” file as per your specifications.
However, it’s important to note that in the above example, only the mentioned permissions will be affected while others remain unchanged. If you intend to comprehensively revise all permissions, you can use the following command:
$ chmod u+rwx,g+r-wx,o-rwx ubuntumint.txt
This command will set the permission as stated below:
u+rwx– This allows the owner to possess read, write, and execute permissions(+xwr).g+r-wx– This permits group users to read the file(+r), while simultaneously removing write and execute permissions(-wx).o-rwx– This eliminates read, write, and execute permissions(-rwx)from other users.
If you wish to explicitly grant read, write, and execute permissions to the file owner (u=rwx), allow the group users only read permission (g=r), and deny all permissions to other users (o=-), you can use the following command:
$ chmod u=rwx,g=r,o=- ubuntumint.txt
Note: It’s worth noting that all three of the above commands achieve the same permissions alteration by utilizing different symbolic notations. The distinction lies in the use of various symbolic notations, allowing you to tailor your approach to the specific task at hand.
If you will want to see the file permissions after the modification, simply use the command:
$ ls -l ubuntumint.txt
The output clearly shows the amended permissions.
Modify File Permissions Using Reference File
In this final method, we will discuss how to use a reference file to mirror the permissions of an existing file onto another file or directory. This approach allows users to ensure consistency in permissions across multiple files or directories, all based on a single reference.
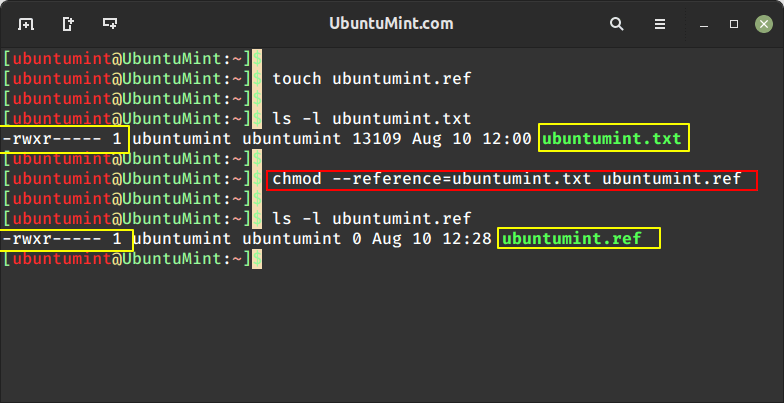
To replicate the permissions of one file onto another without having to manually set each permission flag, you need to first create a target file as shown.
$ touch ubuntumint.ref
To set the same permissions for the file “ubuntumint.ref” as those of the file “ubuntumint.txt“, run this command:
$ chmod --reference=ubuntumint.txt ubuntumint.ref
After discussing the methods for altering file permissions, let’s address some frequently asked questions.
How to Change File Owner’s Permission?
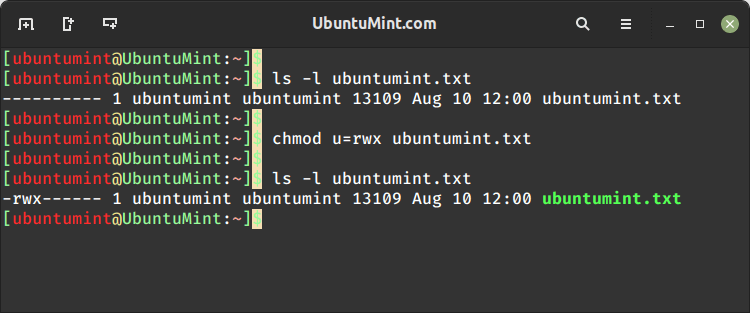
To alter the permissions solely for the file owner without affecting other user groups, you can employ symbolic notation as shown.
$ chmod u=rwx ubuntumint.txt
This command will grant the read, write and execute permissions specifically to the “ubuntumint.txt” file for its owner.
How to Change File Permission for Group Users?
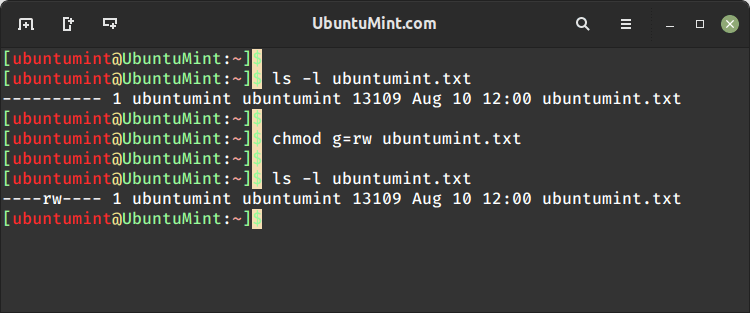
You can allow the group users to read and write the file by running the command provided below:
$ chmod g=rw ubuntumint.txt
How to Change File Permission for Other Users?
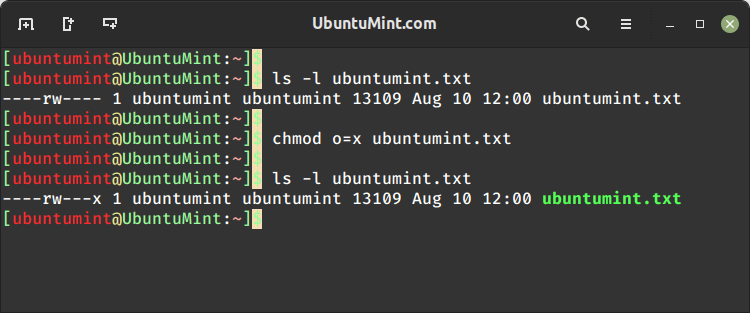
If you wish to give execute permission only to other users while keeping the permissions for the owner and group unchanged, you can use the following command:
$ chmod o=x ubuntumint.txt
Conclusion
With every chmod command you execute, you’re not just changing permissions – you’re shaping the very essence of security and accessibility within your Linux system.
This guide has provided all aspects of the chmod command that you must know to utilize it effectively and gain unparalleled control over file and directory permissions in Linux.
