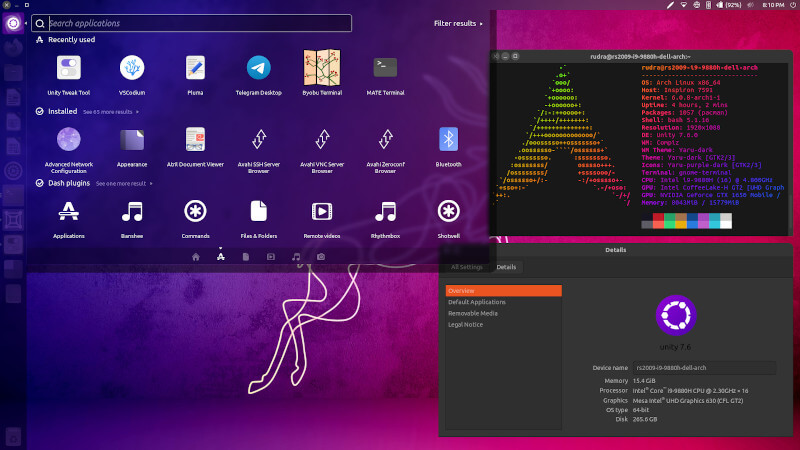
As you may know, the classic desktop environment Unity Desktop was dropped by Canonical in favour of the GNOME desktop in 2017. Those who missed the beauty of Unity can now get back on their nostalgic journey as the Unity desktop has finally been revived.
Though not officially, by a young developer Rudra Saraswat, who is also the creator of the official Ubuntu flavor Ubuntu Unity, Ubuntu Web, UbuntuEd, and Gamebuntu.
The latest Unity 7.6 is now available for Arch Linux with important Unity packages like unity-control-center, unity-settings-daemon, compiz with the Ubuntu patches, nux, unity-greeter, and unity-tweak-tool.
In this article, we will see how to remove the current desktop environment and install Unity Desktop on Arch Linux step by step.
Prerequisites
Before we head to install Unity, you should also make sure Arch Linux is already set up. It is also recommended that you have a clean base Arch Linux system, or else you might encounter problems while installing Unity desktop owing to a conflict between arch-unity repository packages and packages in the community repository.
If you already running other desktop environments such as Xfce, and GNOME on your Arch system, then you should first uninstall your current desktop along with packages belonging to it to minimize the conflicts.
Also, you don’t have to worry about installing or building any packages from Arch User Repository (AUR) as the installation image itself adds an unofficial repository required to run Unity on Arch Linux.
Install Unity Desktop on Arch Linux
Pacman package manager on Arch Linux uses GnuPG keys in a web of trust model to determine the authenticity of packages. Hence, you first need to add the repository key to your system pacman keyring, which you will use to sign packages and authenticate them.
1. Add Arch-Unity Repository on Arch Linux
To install the arch-unity repository, run the following curl command as shown.
$ curl https://unity.ruds.io/repo.key | sudo pacman-key --add -
sudo pacman-key --lsign-key 3FB6809130A5DB7F

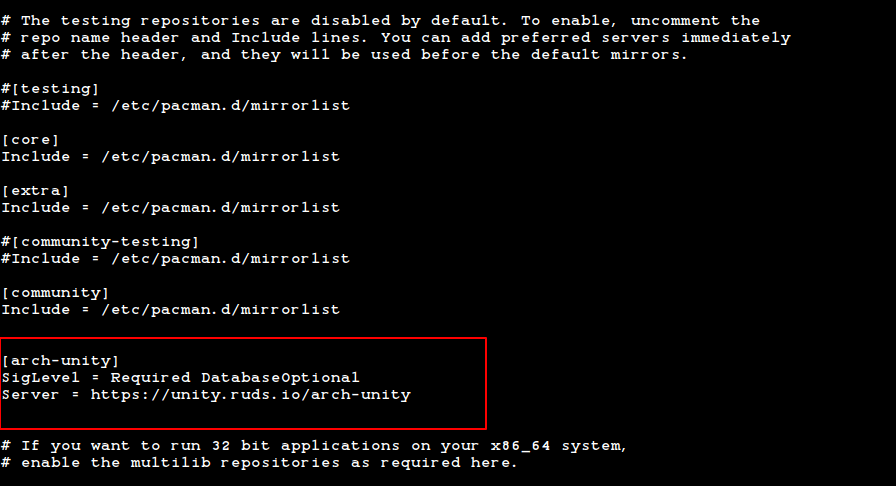
Next, you also need to edit the /etc/pacman.conf file to add the repository location to know where all Unity7 packages need to be retrieved from.
Open the file in your favorite editor and scroll down till you see the [community] repo section. Add the following lines at the end:
[arch-unity]
SigLevel = Required DatabaseOptional
Server = https://unity.ruds.io/arch-unity

Here, the SigLevel option in /etc/pacman.conf determines the level of trust required to install a remote package with pacman -S.
2. Remove Desktop Environment On Arch Linux
In case, you are performing these steps on your Arch Linux system which is already running some desktop environment, then you first need to uninstall it or else Unity will not install and run properly.
So, now first reboot or log out from the system and switch to TTY mode using shortcut keys CTRL+ALT+F3 and remove current desktop packages along with their dependencies by running:
Remove GNOME on Arch Linux
$ sudo pacman -Rns gnome gnome-extra
Remove XFCE on Arch Linux
$ sudo pacman -Rns xfce4 xfce4-goodies
Remove KDE on Arch Linux
$ sudo pacman -Rns plasma plasma-wayland-session kde-applications
3. Install Unity 7 Desktop On Arch Linux
Now, it’s time to finally install Unity Desktop on Arch Linux without downloading any helper packages. Run the below command in your TTY mode to download unity-meta packages that contain almost all packages required for Unity on Arch:
$ sudo sh -c "pacman -Syyu; pacman -S unity-meta"

As you’ll proceed, you’ll be prompted to discard existing packages on your system to resolve conflict with Unity7 packages.
This step might take time as the meta packages include a lot of important applications like Login Manager, Office suite, and Web browser which replace your current already existing applications.
4. Enable LightDM Display Manager on Arch Linux
Once you download Unity Desktop successfully, you also require to first disable your current display manager and switch to LightDM as the default display manager, which is downloaded and installed along with Unity meta-packages.
Though you can also go for any other display manager for Unity desktop, the installed meta package already includes a default Unity theme/greeter for LightDM.
If you want to check the current running display manager in your system, use the command:
$ sudo systemctl status display-manager.service
In the above screenshot, you can see in the first line, it is displaying lightdm as a display manager running.
Now run the below command to start the LightDM display manager at all reboots and make it default:
$ sudo systemctl enable -f lightdm
Reboot your system by running the command:
$ reboot
5. Login to Unity Desktop on Arch Linux
And in the next login, you should see the LightDM prompt in the session list where you can log in to enjoy your Unity desktop environment version 7.6 on Arch Linux.

Conclusion
Being an Arch Linux user, I hope you would not have found these steps difficult to get along with. You first need to completely purge your current desktop environment in order to get Unity on Arch in replace.
But it’s totally worth it if you want to combine and get the best out of the rolling Arch Linux with classic Unity desktop.
