In most environments, IP addressing is achieved using DHCP, which is a protocol that automatically dishes IP addresses to clients so that they can be part of a network. While convenient, sometimes, a static IP is preferred especially when you want to configure a server to serve as a web, database, or FTP server to mention a few.
In this guide, we will illustrate step-by-step instructions on how to configure a static IP address on Alpine Linux.
Checking the Current IP Address on Alpine Linux
Before configuring a static IP on your system, it’s prudent to confirm the current IP configuration on your Alpine Linux system. Here, our Alpine Linux is configured to use the DHCP protocol in order to fetch an IP address from the router which is the DHCP server.
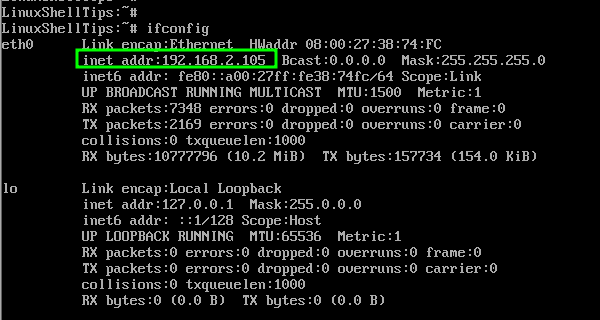
To check the IP on your active network interface, run the ifconfig command:
$ ifconfig
From the output, you can see we have an active interface called eth0 that is assigned the IP address 192.168.2.105.
Next, we are going to assign a static IP address to this interface.
Configure Static IP Address on Alpine Linux
The configuration file for network interfaces is the /etc/network/interfaces file and you can view the configuration file using the following cat command:
# cat /etc/network/interfaces
The first interface configuration is the loopback address:
auto lo
iface lo inet loopback
The second configuration is the active network interface IP configuration, which, by default, is set to use DHCP.
auto eth0
iface eth0 inet dhcp
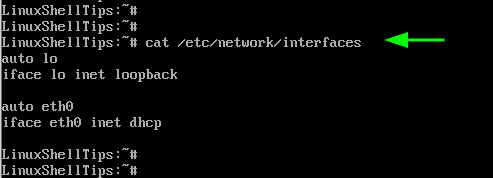
We are going to configure a static IP of 192.168.2.110 with the gateway of 192.168.2.1 (The router’s IP address).
So, first, comment the second block of code with the hash symbol ( # ) to disable DHCP addressing for the eth0 interface.
#auto eth0
#iface eth0 inet dhcp
Next, paste the following lines of code. Be sure to set the IPv4 address and gateway to match your environment’s IP subnet.
auto eth0
iface eth0 inet static
        address 192.168.2.120/24
        gateway 192.168.2.1
        hostname linuxshelltips
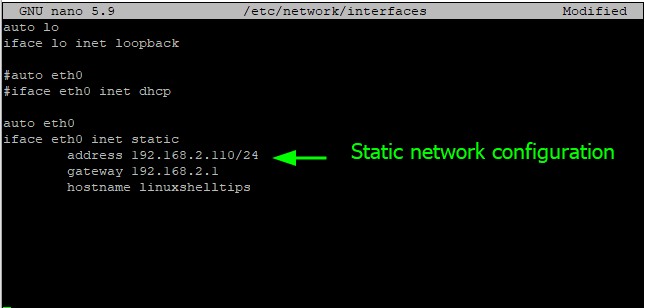
Save the changes and exit.
Next, restart the networking daemon to effect the changes made.
$ service networking restart

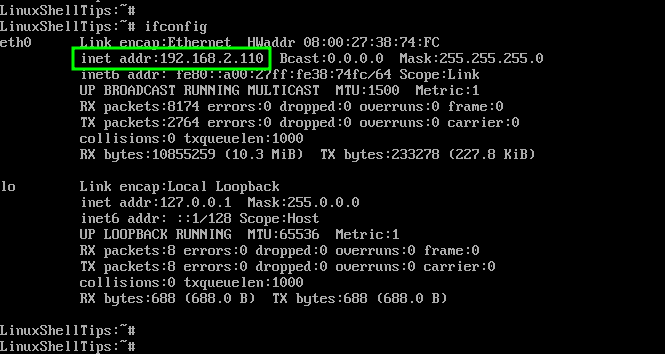
Now confirm that your new IP address has been applied to your network interface.
$ ifconfig
OR
$ ip a
Assign Multiple IP Addresses on Alpine Linux
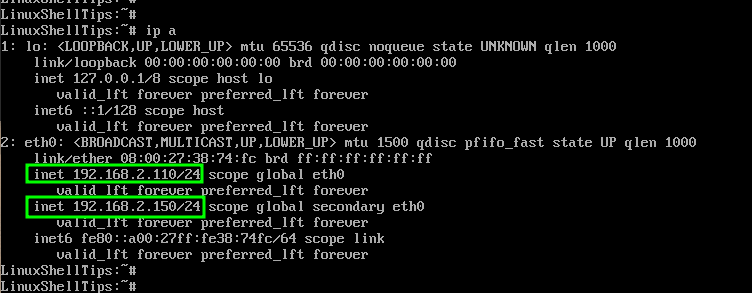
Additionally, you can assign multiple IPs to the same network interface. In this example, we have assigned an additional IP 192.168.2.150 to the eth0 interface.
iface eth0 inet static
        address 192.168.2.150/24
As always, remember to restart the networking service to save the changes.
$ service networking restart
Now confirm the IP configuration using the command:
$ ip a
The output confirms that the interface is now associated with 2 IP addresses that we have just configured.
Configure DNS or Nameserver IP in Alpine Linux
The /etc/resolv.conf file contains information about your DNS server / nameserver. Ideally, you don’t need to change the entries if you were already using the DHCP configuration.
Simply confirm that you have the entries as shown.
nameserver 192.168.2.1
The IP address is the address of the DNS server which, in most cases, is the router’s IP. Once you are done making changes to the /etc/resolv.conf file, restart networking to apply the changes.
And there we go. We have successfully demonstrated how you can configure a static IP on Alpine Linux.
