Provisioners are tools that allow you to automate your workflow when you are booting up a virtual machine. Vagrant support provisioners like file, shell, ansible, puppet, and salt stack. You can use any of these tools and automate your virtual machine deployment workflow.
[ You might also like: Getting Started with Vagrant and VirtualBox ]
This article will see two of the provisioner’s File and Shell that you may use regularly when you are deploying new virtual machines.
How to Use a Shell Provisioner in Vagrant
Shell provisioners allow you to execute shell commands in your vagrant machine. To use shell provisioner you have to pass shell as the argument to vm.provision method.
config.vm.provision "shell"
There are two ways you can execute shell commands in vagrant.
- Inline scripts
- External scripts
How to Work with Inline Script in Vagrant
In the inline script, you will pass the shell commands inside the Vagrantfile. There are many ways to use an inline script. The below example shows how to use an inline script. After defining the shell provisioner you have to pass inline and command as a key-value pair. Go ahead and modify the Vagrantfile and add the above line.
config.vm.provision "shell", inline: "echo Welcome to linuxshelltips"
Before running any provisioner there is an important point to be noted. Provisioner normally runs only when you execute “vagrant up” for the first time.
Take a look at the below image, I added the shell provisioner to the Vagrantfile and started my virtual machine and it tells me to use the --provision flag since this is not the first time I am booting this VM.

$ vagrant up --provision           # Starting the VM
$ vagrant reload --provision       # Restarting the VM
You can also use block syntax which offers more readability. This is the same as the previous one-line definition.
config.vm.provision "shell" do |cmd|
    cmd.inline = "echo Welcome to Linuxshelltips"
end
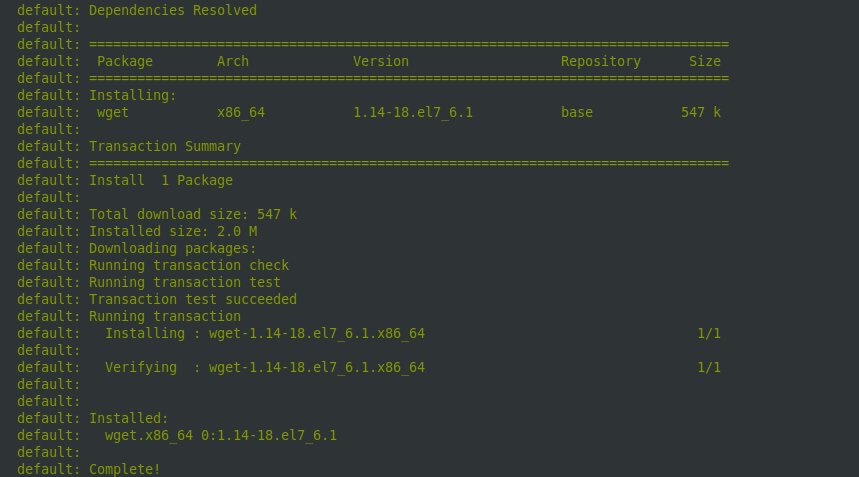
If you have worked with bash you might have used heredoc. Similar to that Ruby also supports Heredoc which you can use in vagrant files and redirect a series of bash commands to it. Here I am trying to install epel-repository and install the wget command.
$COMMANDS = <<-'BLOCK'
yum install epel-release -y
yum install wget -y
BLOCK

config.vm.provision "shell", inline: $COMMANDS
Let me explain what the above code does. I am creating a variable called $COMMANDS and storing heredoc in the variable. I am passing the $COMMANDS variable as the value to inline which will run the series of yum commands we passed inside the block of code.


You can see from the above screenshot both epel-repo and wget are installed successfully. You can also call the scripts that are already available in the vagrant machine. I have a test script named welcome.sh in vagrant host and to run it add the following syntax to the configuration file.
config.vm.provision "shell",
    inline: "/usr/bin/bash /home/vagrant/welcome.sh"

If you want the provisioner to run whenever you start/reboot your virtual machine then you can use block style definition and pass “always” to “run”. Run accepts two values “always” and “never”. When set to “never” the provisioner will not run.
Vagrant.configure("2") do |config|
  config.vm.provision "shell", inline: "/usr/bin/bash ~/welcome.sh",
    run: "always"
end
You can also pass --no-provision flag with the start/reboot command to suppress the run parameter behavior.
$ vagrant up --no-provision
$ vagrant reload --no-provision
How to Work with External Script in Vagrant
An alternate option to the inline script is the external script. This is pretty simple, create a shell script externally and provide the path of the script in the shell provisioner as below.
config.vm.provision "shell", path: "/home/karthick/welcome.sh"
The vagrant will copy the script to /tmp/ location in the virtual machine and will trigger the script.

How to Use File Provisioner in Vagrant
File provisioner lets you upload files are directories to the vagrant machine from your host machine. File provisioner accepts two parameter source paths and destination paths.
To copy a file add the following property in your Vagrantfile with source and destination path. Replace source and destination path according to your location.
config.vm.provision "file", source: "/home/karthick/vagrant/centos7/script.sh" , destination: "~/script.sh"
If you start/restart the virtual machine you will see in the log file provisioner is called and the file is copied to the virtual machine.

To copy a directory you have to pass the directory path in source and destination. If you want the same name for your directory as in the source you have to provide the destination name same.
config.vm.provision "file", source: "/home/karthick/vagrant/centos7" , destination: "~/centos7"
In the next article, we will take a look at how to ansible provisioner to automate our workflow using playbooks.
